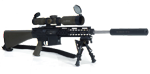
It would seem that over the last decade or so, long range rifle marksmanship has gained a lot of momentum within the civilian shooting community. Typical of any influx of interest in a given activity, the supporting markets will follow, and as such we have seen a huge increase in the production of heavy barreled target type rifles, long range optics, and all sorts of other peripheral equipment designed to aid the shooter in long range marksmanship. One of the products we are seeing more of these days are scopes that have been outfitted with mil dot reticles, and that is a subject on which I'd like to spend a little time here now.
The mil dot reticle can be a very useful tool to the long range marksman, but only if that marksman knows how to use it correctly. In this article ,I am going to explain how to "mentally break down" the mil dot reticle, and employ it's features to estimate the range to the chosen target.
The word mil in mil dot is a shortened term for the word milliradian. The easiest way to explain what this is would be to think of milliradians in the concept of the degrees of a circle. Milliradians are much like degrees, in that they are "slices of a circle". Where there are 360 degrees, or "slices" in a circle, there are 6400 milliradians in a circle. This allows for a much finer increment of measure when dealing with arcs, particularly over a long distance.
Mils are not a new concept in the world of accuracy. The sniper community borrowed this bit of knowledge from the artillery community, who has been using it as a means to accurately rain hell on our enemies for over a century. Since a degree is such a large "slice" of a circle, the artillery guys needed something a lot more precise...firing a howitzer even one degree off course will result in an impact several hundreds of meters off of target at the ranges these weapons are capable of. As such, the milliradian has been the go-to for accurate gun adjustment and accurate artillery fire for generations of cannon jockeys. Somewhere along the way, some wise guys got tired of saying and spelling milliradian, and so the term mil was coined, and it stuck...pocket protector toting scientific lab tech folks might still like to say milliradian, but gun toting cavemen like me are just fine with mil.
Back to the reticle, the second word in mil dot is dot. Take a peek through the reticle, and it will be immediately apparent to you where the word dot comes from. For those of you who don't have a mil dot reticle to look at, it looks like this:
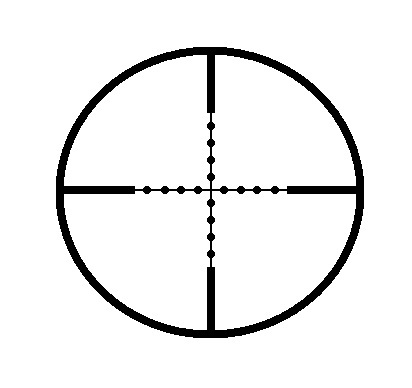
As you can see, the reticle pattern is made up of a standard duplex, on which has been arranged a total of 16 mil dots., configured on the reticle as shown.
Now, to bring the two words together into one entity, we have the mil dot. Mil dots are not from the artillery world, but rather a creation of our own design. (and by our I mean rifle shooters.) With the proper application of the mil dot formula, which I will cover, a shooter can obtain a very good estimation of the range to a target that is otherwise unknown. The first thing to know is what this reticle actually represents, in terms of measurements. Take a look at the image below...
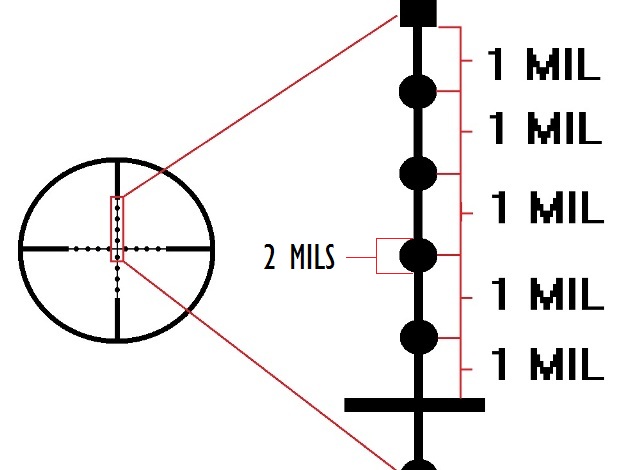
This is an expanded section of the reticle's vertical stadia line. As indicated, the distance from the center points of each dot, (and from the center of the reticle to the center of the first dot) is 1 mil. Also, the diameter of each dot represents .2 mils. Notice that is .2 and not 2.
Let's go back a bit, and look at what a mil represents in terms of measurement.
Mils relate to range in much the same way as minutes of angle (MOA.) relate to range. Minutes are expressed as being a rough distance of 1 inch at 100 meters. This measurement expands, however, as the range increases. Thus, a minute of angle represents 1 inch at 100 meters, 2 inches at 200 meters, 3 inches at 300 meters, and so on, respectively.
Mils follow the same pattern of behavior as the range increases, but they represent a much wider area of measure. A unit of one mil represents 3.438 inches at 100 meters. You can stick with that, but I like to simplify things a bit, and call it 3.5 (this makes the math a lot easier to deal with, rounding it down to the nearest half.) Thus, one mil at 100 meters represents 3.5 inches , 7 at 200, 10.5 at 300, 14 at 400, and so on. (see illustration below.)

Now let's return to that reticle break down. Remember that we've established that from the center of one dot to the center of another represents a unit of 1 mil. This is where things get a little tricky, and if your vision is not the best, it can get downright impossible. To break this reticle down further, you have to be able to see what isn't actually there. You must now be able to "mentally break down" each unit of one mil into tenths...see below.
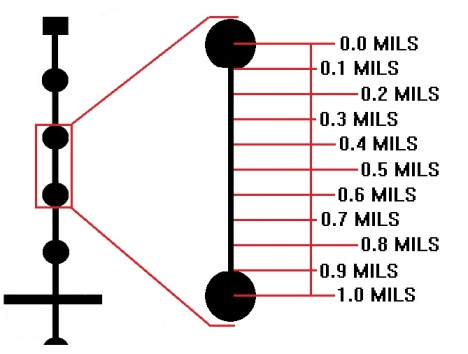
Notice that in this illustration, this section of the reticle representing 1 mil, from the center of one dot to the center of the next, has been broken down into tenths starting from the top and moving down. Anyone out there with a mil dot scope can immediately see the problem with this...the scale of the reticle is so small that being able to precisely imagine these increments is very difficult. This technique is just like shooting-it takes a lot of practice to get it right, and constant application to maintain proficiency. The payoff to all of this work, however, is that a trained eye can estimate range accurately out to 1,000 meters and beyond, and obtain first-round hits most of the time.
Having explained how to break down the reticle into it's incremental measurements, let's look at how we apply this information to a target.
In addition to the working knowledge of breaking down the reticle, there is a bit more information needed in order to estimate range to the target. Unfortunately, this next factor into the equation isn't always the easiest bit to obtain...you need to know the size of your target in inches, and you need to be pretty much spot on, especially as the range increases.
For target shooters, this isn't a huge deal. All the target shooter needs to do is simply measure the size of the targets he or she will be shooting at, prior to placing them in the field. For tactical shooters who have the task of eliminating enemy personnel, it can be a bit more tricky. As we all know, there is no one-size-fits-all dimension for human beings. There are some basic guidelines, but everyone is built a bit different. To augment this information, tactical shooters tend to collect data on objects that are commonplace within the environment that they are operating in. For example, when I was in Iraq, I would often see the same make and model of truck (there seems to have been about 20 billion Toyota type pick up trucks, all painted white with a red pinstripe sold in Iraq) So I measured the diameter of the tires of these trucks as soon as I could get close enough to one to do so. I also measured the height and width of the bed, the windshield, the tail gait, etc. I would also measure the average dimensions of door openings, windows, etc. I compiled a chart of this data in a note book I carried with me at all times. I could then usually find at least one of these object within relatively close proximity to my intended target, and use that to get a good estimation of the ranges I was working with. For deer hunters, unfortunately the task is daunting. Neither deer nor the trees they hide in fall into a certain dimensional measurement, as they too are all different...so unless your deer is standing next to a feeder that you happen to know the dimensions of, in inches, you're pretty much S.O.L...odds are, you already know the range to your feeder anyhow.
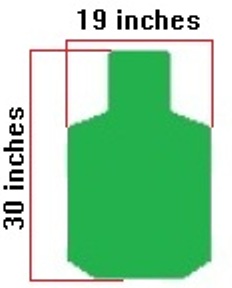
For the purposes of this instruction, let's assume that our target is a standard military type (E-type) silhouette target. These targets measure 19 inches wide by 30 inches tall...
Now let's take what we've learned about the breakdown of the reticle and super-impose that over our target...
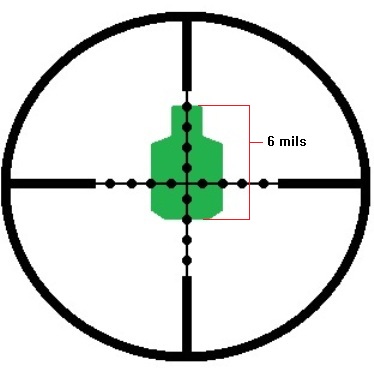
This illustration represents what the shooter sees when a target has been acquired with a mil dot reticle. Notice that this target is measured as being six mils tall, from the center of the top-most dot at the edge of the "head", to the second dot from center at the bottom edge, for a total of six mils. This is the final piece of data we need with which to extrapolate our target's range using the mil dot formula, which is as follows...
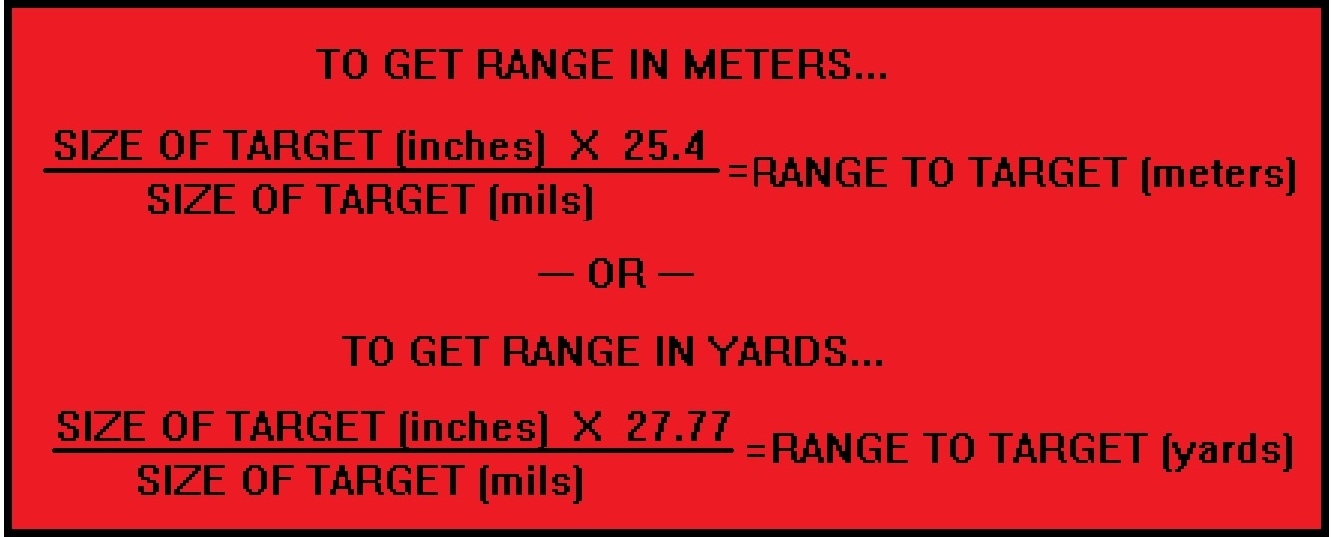
As stated in the illustration above, the shooter must now multiply the size of the target in inches, which in this case is 30 inches (height of the target) and multiply this number by 25.4 to obtain range in units of meters. If the shooter wishes to obtain this range in units of yards, then the target's size must me multiplied by 27.77 .
In our example, the target height is 30 inches. When multiplied by 25.4, we get 762. This number is known as a "constant." as such, it will never change. Hence, it is a good idea to make a chart with a column on the left, starting at 1, and ending in, say, 100. This column represents inches. In the column on the right, go ahead and multiply each of these numbers by 25.4, and write down the corresponding constant in this column. As an option, a third column can be made, and in this column the constants for inches multiplied by 27.77 for yardage constants can be recorded. This list can now be added to your data book, range bag, or even taped to your rifle's butt stock and used as a quick reference tool.
Back to our example, we've now determined that our constant is 762 (or 833, when multiplied by 27.77 for yardage increments.) We must now divide this constant by our "target size in mils" which we have determined by measuring the target size with our mil dot reticle. Remember in the example above, we decided that our target was "milled" at 6 mils...so lets divide our constant of 762 for meters by 6. This gives us a figure of 127, which is the range to our target in meters. when divided by 833 for yards, we get 138.8, which we will round to 139, for a distance of 139 yards to target.
Now let's look at another example...
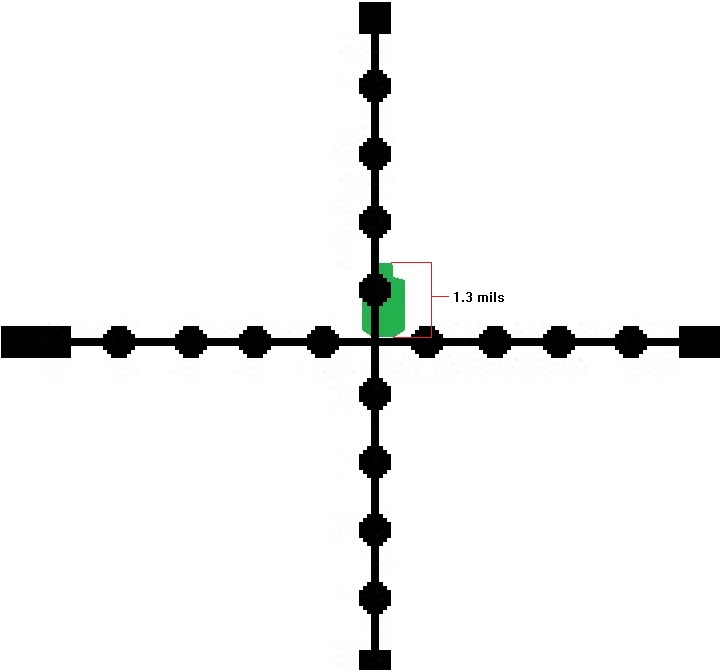
Notice that in this example, our target is now reading a mil read of 1.3 mils. This is an instance in which being able to accurately break down the mil dot reticle into tenths of mils will come into play, and I will now explain why it is critical to be as accurate as you can with this measurement.
Let's assume that when we mil our target, we mis-read the reticle and decide that our target is reading to be 1.5 mils tall-an error of only .2 mils, or the diameter of one mil dot. Look at the two equations below, where I will extrapolate range in meters by both our actual read of 1.3, and again in our erroneous read of 1.5;
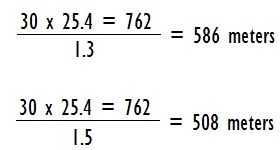
Notice that a deviational error of only . 2 mils has created an error in the extrapolated range of 78 meters. Given the ballistic trajectory of most rifle rounds at this range, this error will most likely result in a complete miss of the intended target. The margin of error that results from mis-reading a mil read expands over range. For example, let's assume that we mil a target at .5 mils. Let us also assume that we have erroneously missed the actual read, this time by only .1 mil, for a read of .4 mils.
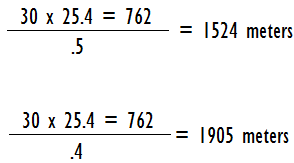
As can be seen in this example, an erroneous read of merely .1 mil has given us a range error of 381 meters. An error of this degree will obviously result in a huge miss, and is a good indication of why it is absolutely critical to accurately read the mil dot reticle, especially when dealing with extremely long ranges. As I am sure you've deduced already, this method has a lot of issues. Not only is it subject to human error, but it is also somewhat slow, as most of us cannot simply run the formula in our heads on a moment's notice, if at all. (I use a simple pocket calculator by the way.) If your target is on the move at all, then by the time you get this formula worked out for a range, you will discover that your target is no longer at the range you've extrapolated. The laser range finder is by far the best and fasted method that exists currently, but the mil dot reticle and it's formula are still functional tools, and a good thing to know, should your range finder break, run out of battery power, or get lost in the field.
As with any subject you might want to learn, it is always a good idea to test yourself. As such, I am including a few equations for you to work out at home. I will list the target sizes, along with a random mil read, and let you guys use the mil dot formula to determine the corresponding ranges. I will post the answers at the bottom of this article, in both meters and yards, to check your answers against. So grab yourself a calculator, and give it a shot...
TARGET 1 - 30 inches tall, mil read of 2.7
TARGET 2 - 21 inches wide, mil read of 3.1
TARGET 3 - 36 inches tall, mil read of .7
TARGET 4 - 10 inches tall, mil read of 1.1
TARGET 5 - 50 inches wide, mil read of 1.8
There are a few "situational" considerations to take note of when milling a target with the mil dot reticle. Obviously, a target that is partially obscured, by tall grass, as an example, will give off a false mil read because only part of the target is exposed. Another thing to think about that is not as readily obvious is the angle at which a target is presented. A flat object such as a steel ringer target will appear to be narrower than usual if viewed at an angle. A good example of this is to view a standard open door, and notice it's proportional size as compared to the door's opening...see below;
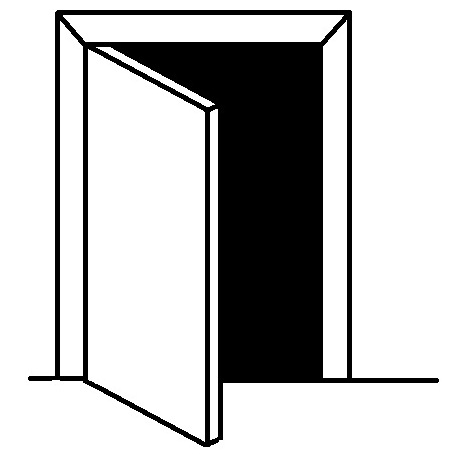
Notice that the door appears narrower than it actually is, due to the angle at which it sits from the point of view of the viewer. This is the same effect observed when viewing a target at an oblique angle to the shooter. This phenomenon will obviously create a false mil read if the shooter uses the horizontal axis as a base for the mil read. This is why the vertical axis of the target should be used whenever possible. It is also desirable to use cylindrical objects such as barrels or poles for obtain horizontal mil reads, as a cylinder's overall dimension will not change regardless of the angle at which viewed.
It is a good idea, when time permits, to use multiple mil reads off of the same target to estimate range. In other words, mil the target vertically and horizontally, and work up the formulas for both reads. Then compare the extrapolated ranges and see if they are the same, or at least very close. By this method, you are effectively double checking your work for accuracy, and may save yourself from an erroneous shot.
It should be mentioned that most scopes with variable magnifications will not adjust the size of the reticle when the magnification is changed, and that the reticle has been scaled to accommodate the highest power setting on the magnification, in most cases. A good way to determine where your reticle is scaled to throughout your magnification range is to fabricate what is known as a "barber's pole." To construct one, obtain a straight board or a section of PVC pipe, and measure/mark out increments of 3.5 inches along it's length. Wrap tape that contrasts to the color of the pipe/board around every other marking, so that the tape bands are 3.5 inches wide and 3.5 inches apart. Now measure off a distance of 100 meters and stick one end of the barber's pole into the ground at the 100 meter line. Now return to the other end of your 100 meter line and acquire the barber's pole in your scope. Adjust your focus until the sight picture is as crisp as possible, and while you hold the rifle steady, have a friend slowly adjust your magnification until each mil dot indexes the tape bands at the edges. Make note of the magnification setting your rifle is now set for-this is the effective magnification for your mil dot reticle.
Well folks, that's it in a nutshell. The mil dot reticle has other applications as a crude bullet drop compensator when the appropriate data is collected and logged, but that is a subject for another write. There are also some methods and techniques for employing the mil dot range estimation formula that can make it a bit more "user friendly"...particularly in a real-world tactical scenario-but again, I'll save that one for another time. Leupold has also created a great modification of the mil dot reticle called the tactical milling reticle, which breaks down the measurements even further...but that is a post for another time as well. For now, Good luck in all of your shooting endeavors, and everything that you do.
MILDOT EXCERSISE ANSWERS...
1- 282.2 meters, 308.5 yards
2- 172 meters, 188.1 yards
3- 1,306.2 meters, 1,428.1 yards
4- 230.9 meters, 252.4 yards
5-705.5 meters, 771.3 yards